meta data for this page
Solid Edge
The integration of speedyPDM in Solid Edge ® takes place as an addin.
The speedyPDM Solid Edge addin provides a roll-up window in addition to the usual menus and toolboxes.
Rollup
The rollup window is positioned above the title bar of SolidEdge and opens automatically when you move the mouse pointer over the title bar.
The rollup window closes automatically when you work in SolidEdge.
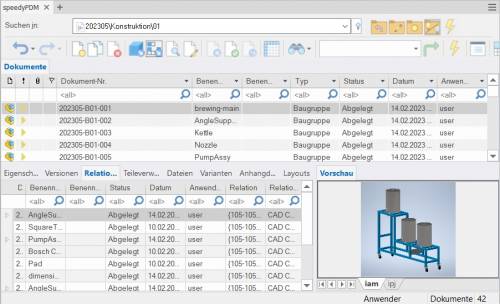
The rollup window has a similar structure to the speedyexplorer with the exception of the navigation bar, which has been implemented in the form of a drop-down list to save space.
Alternatively, the roll-up window can also be displayed as a SolidEdge window that can be pinned. In this case, the window can also be positioned freely or pinned to a main window page.
Navigation and project/folder management in the rollup window
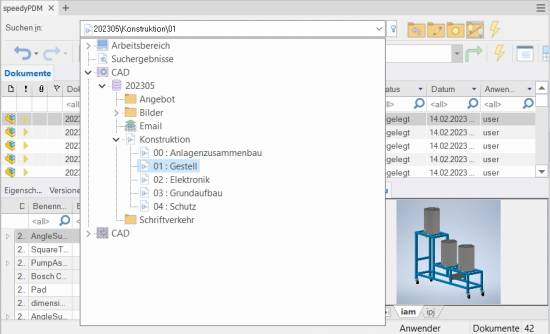
The navigation area is located in the upper part of the roll-up window in the form of a drop-down bar.
The operation is similar to the navigation in speedy-Explorer.
Click on the [-] or [+] symbol to open or close the corresponding tree.
The same is achieved by double-clicking on the folder symbol.
Double-clicking on a directory entry sets the working directory and closes the navigation window.
After selecting a path, the documents are already displayed in the background.
To the right of the navigation bar is a toolbox for project and folder management:
Toolbar
Create new document
There are several options to choose from:
SolidEdge:
- You create a new file with the SolidEdge command File “ New.
- You create the model or assembly using the usual SolidEdge methods.
- You select the SolidEdge command File ” Save.
- The speedy dialogue “New Document” appears.
Enter your details for the new item.
Rollup window:
- Select the command “New Document”.
- The speedy New Document dialogue appears.
- Enter your details for the new item.
speedy Creates a new document and creates an empty document file based on the template. - The new article is marked in the document list.
- Select the “Open Document” command.
- The empty document file opens.
Open file
There are several options to choose from:
SolidEdge:
- Select the SolidEdge command File “ Open.
- The speedy dialogue Open file is displayed.
- Select the desired document and confirm the dialogue with Open.
Rollup window:
- Search for the document to be opened.
- Select the command “Open document”.
Open drawings
Ribbon speedy ” Open drawing
Context menu “ Open drawing
Opens the drawing for the currently opened model (part/assembly).
If no drawing exists yet, a drawing is automatically created and opened based on the templates defined in the document type.
Selecting a component in an assembly opens the drawing of the selected component.
Open component
Ribbon speedy ” Open model
Context menu assembly “ Open model
If you have opened an assembly and want to open the model of a component or a subassembly for editing, you must use the speedy command Open Model command. Parts and sub-assemblies are only loaded in read-only mode when opening an assembly to prevent unnecessary extraction from the speedy database and accidental modification. So when you use the SolidEdge command to open parts, they are opened in read-only mode.
Insert component
You have opened an assembly and want to insert an existing part or another assembly. You have several options to choose from:
SolidEdge:
- Select the SolidEdge command Insert ” Place Component “.
- The speedy dialogue Open file is displayed.
- Select the desired document and confirm the dialogue with OPEN.
Rollup window:
- Locate the document to be opened.
- Select the document in the document list.
- Drag into the drawing area of SolidEdge(Drag & Drop) with the left mouse button pressed.
- The part or assembly linked to the document is inserted into the current assembly and “hangs” on the mouse pointer.
Extract
Extracts the current file or selected component for editing.
If you have opened a file only for viewing, you can use the command Remove to put the current file to work.
A selected subcomponent of an assembly is put to work and opened by the command.
Item Properties
Edits the item properties of the current item or the selected component.
After closing the properties dialogue, the iProperties are updated according to the configuration.
If the command is executed in a drawing, the title block is updated.
Save
When saving assemblies, the system checks whether the assembly still contains parts or subassemblies that do not belong to the current project.
The message can only be confirmed with OK. However, the file is saved in any case.
Use the command Rename Component to rename parts that do not belong to the project.
If the current file is used several times, a message window also appears when saving:

You now have the option of saving the file under a new item number or under the same name.
If a referenced file has been changed in an assembly, an extended dialogue appears with a list of all referenced files:
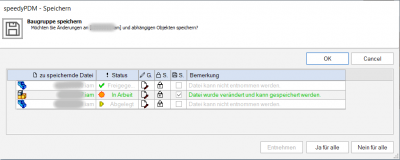
The list shows the following information:
| Column | Heading | Description |
|---|---|---|
| 1 | File to be saved | File name of the referenced file. |
| 2 | Status | Current document status (Filed, In progress, Released, …). |
| 3 | Changed | A tooltip explains the type of change in the file. |
| 4 | Write-protected | The symbol indicates whether the file is currently write-protected (closed lock) or writable (open lock). |
| 5 | Save | Check box for marking the files to be saved. Only files that are also writable can be saved. |
| 6 | Comment | Note text or error message. |
- By double-clicking on the status symbol in a line, the document is taken in process and can also be saved.
- The command [Remove] takes the document of the selected line into work.
- The command [Yes for all] marks all files for saving that can also be saved (taken by the current user).
- The command [No for all] removes the marking for saving.
If an error occurs with a file during saving, this is logged in the comments column.
The dialogue closes automatically after a successful save.
Saving and closing
To close a file managed in speedy, you should select the command Save+Close from the speedymenu.
Ribbon speedy ” Save+Close
The model is zoomed into the window and an isometric view is set to provide a meaningful file preview, then the file is saved and closed.
Copy and Replace Components
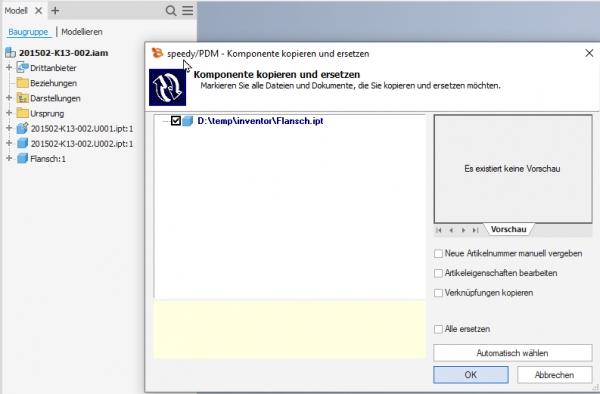
The command “Copy and Replace Components” is used to rename components that are not part of the project or to add files that are not yet managed.
Ribbon speedy “ Replace component
Context menu assembly ” Replace component
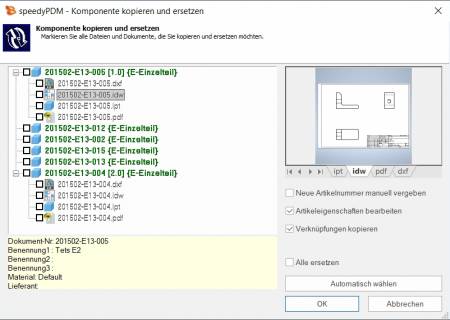
The following dialogue appears:
The dialogue shows the complete assembly structure with all referenced files. Select all the components you want to replace.
The tree structure distinguishes the following features in the display:
- Entries in green font represent an already known speedy document.
- Entries in blue font represent an unknown local file.
- Entries in red font represent a file that does not exist.
- Entries in grey font represent an additional file with the same name as a main entry.
- Bold Entries written in bold are main entries for which there may be additional files with the same name.
By pressing the “Select automatically” button, all non-project components are automatically selected. By confirming the OK button, the marked components are renamed one after the other. Depending on the option “Assign new item number manually” or “Edit item properties”, further dialogues appear for each new item.
Update component
Replaces the selected component with the latest version of the item.
Part Usage
Displays the part usage of the current file or the selected component.
Reference Manager
Opens the reference manager for the current assembly file (see also Reference Manager).
Purchased parts/U-Parts
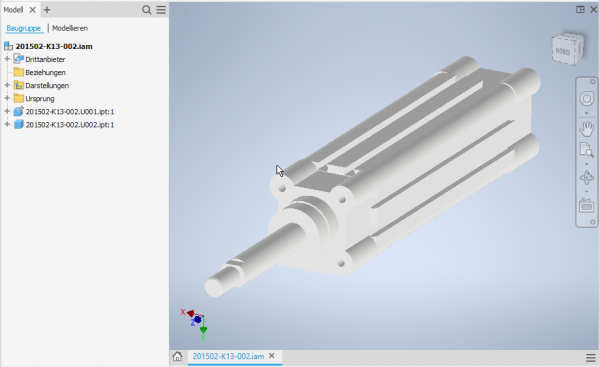
Frequently, purchased, standard or customer parts must be described with the help of an assembly file and several parts files.
A typical example is a pneumatic cylinder. In order to be able to use movement or different installation states, an assembly file with corresponding part files must be constructed.
However, the administration is only interested in the cylinder as a whole.
For this purpose, either all document types that do not have a parts list are treated as a “parts” document type or the document types are enumerated with the configuration parameter [solidedge.partrename.partdoctypes].
If now an assembly file is stored in SolidEdge in speedy and a “parts” document type is selected in the new dialogue, all components are automatically stored as U-parts:
Add more U-parts
If you want to add more U-parts to an existing purchased part, add the component to the SolidEdge assembly using the usual means.
Now use the speedy “Copy and Replace Component” command.
Select the component and do not select anything else in the dialogue.
The component is now automatically added to the speedy document as a U-part and renamed accordingly.
Replace U-parts
If you need to replace certain U-parts on an existing purchased part, open the SolidEdge assembly for machining.
Now replace the desired U-parts with the new components.
Now use the speedy command “Copy and replace component”.
Select the component and do not mark anything else in the dialogue.
The component is now automatically added to the speedy document as a U-part and renamed accordingly.
Edit parts list
Ribbon speedy “ Edit parts list
Context menu assembly ” Edit parts list
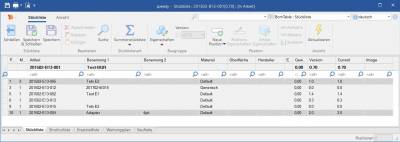
Opens the parts list dialogue with the current assembly parts list. If there is no BOM yet, the BOM is created automatically.
To update the speedy parts list, the SolidEdge assembly is analysed.
This is the only way to ensure that changes to the parts list are immediately applied to the open assembly.
Assembly and drawing opened:
If you have opened the assembly and the associated drawing, you must save changes in the assembly before switching to the drawing.
When you save, the speedy parts list is updated.
This ensures that BOM changes are immediately visible in the drawing.
Save as
Saves the active file in an additional file format.
The additional file is saved with the same file name in the same directory as the current file.
Depending on the opened file type (.par, .asm, .dft), different storage formats are available.
User Options
Opens the dialogue for editing the user options.
Reset messages
Some warnings, error messages and user queries can be deactivated by selecting an option “Do not ask this question again” or “Do not report this notice again” in the message dialogue. These deactivated messages can be reactivated using this command. A dialogue with all deactivated messages appears. Select all messages that are to be reactivated, i.e. that are to reappear the next time a message is displayed, and confirm the dialogue with OK.
Installation
System requirements
An addin is available for the following SolidEdge versions:
| SolidEdge Version | speedy Addin |
|---|---|
| SolidEdge 2022 | seSpeedy2022.dll |
Register Addin
If you have used the installer for the client workstation the SolidEdge addin will be registered automatically. Manually, the SolidEdge addin can be installed using the batch file register_solidedge.cmd.
Start the batch file register_solidedge.cmd from the respective platform subfolder (bin64) of the speedy directory. The batch file always registers the latest SolidEdge addin. If you want to install a specific addin version, you can also register it via command line. To do this, open a command prompt and enter the following command:
regsvr32.exe \\<servername>\speedy_bin$\bin64\seSpeedy2022.dll
In SolidEdge you can use the Addin Manager to check whether speedy has been registered correctly and to control the loading behaviour.
Client Installation/Update
The installation steps mentioned above are carried out automatically by the client setup programme (speedy-client.exe). Alternatively, you can also call the batch file register_solidedge.cmd after a SolidEdge update or upgrade, for example.
x:\speedy\bin64\register_solidedge.cmd
Administration
File Properties
The assignment of speedyPDM document properties to file properties is done with the help of a configuration and assignment file (see also Konfiguration).
The configuration files are located in the subdirectory “\config”.
Assignment of document properties to file properties
The assignment of the document properties to the file properties is done in the configuration file seSpeedy.ini.
SolidEdge divides the file properties into several sections:
| Name | DisplayName |
|---|---|
| SummaryInformation | |
| ExtendedSummaryInformation | |
| DocumentSummaryInformation | |
| ProjectInformation | |
| MechanicalModeling | |
| Custom | user-specific properties |
The user specific properties are mapped normally by attribute mapping. The SolidEdge specific file properties are addressed via the range:
| DisplayName | Name |
|---|---|
| Title@SummaryInformation | |
| Subject@SummaryInformation | |
| Author@SummaryInformation | |
| Keywords@SummaryInformation | |
| Comments@SummaryInformation | |
| Revision number@SummaryInformation | |
| Last author@SummaryInformation | |
| Editing time@SummaryInformation | |
| Last printing date@SummaryInformation | |
| Date of origin@SummaryInformation | |
| Last saved@SummaryInformation | |
| Page number@SummaryInformation | |
| Word count@SummaryInformation | |
| Character count@SummaryInformation | |
| Application name@SummaryInformation | |
| Data security@SummaryInformation | |
| Name of Saving Application@ExtendedSummaryInformation | |
| DocumentID@ExtendedSummaryInformation | |
| Status@ExtendedSummaryInformation | |
| Username@ExtendedSummaryInformation | |
| CreationLocale@ExtendedSummaryInformation | |
| Status Change Date@ExtendedSummaryInformation | |
| User Display Name@ExtendedSummaryInformation | |
| Category@DocumentSummaryInformation | |
| Presentation Format@DocumentSummaryInformation | |
| Number of bytes@DocumentSummaryInformation | |
| Lines@DocumentSummaryInformation | |
| Paragraphs@DocumentSummaryInformation | |
| Slides@DocumentSummaryInformation | |
| Notes@DocumentSummaryInformation | |
| Hidden Objects@DocumentSummaryInformation | |
| Multimedia clips@DocumentSummaryInformation | |
| Manager@DocumentSummaryInformation | |
| Company@DocumentSummaryInformation | |
| Document Number@ProjectInformation | |
| Revision@ProjectInformation | |
| Project Name@ProjectInformation | |
| Material | Material@MechanicalModeling |
Advanced customisation
With the help of the script file “aisSpeedy.vbs” further adjustments can be made in Autodesk SolidEdge. The script file is located in the speedy subdirectory “\script” and is also loaded when the addin is loaded.
In the script, it is possible to react to various events in Autodesk SolidEdge and the speedy addin. The following event functions are available:
| Event routine | Description |
|---|---|
| OnInit | Called after the addin has been initialised. |
| OnFileSave | Called when a file is saved. |
| OnFileSaveAs | Called when a file is saved. |
| OnFileCheckIn | Called when saving and closing a document. |
| OnFileRelease | Called when a document is released. |
| OnReleaseRecreate_SaveAs | Called when releasing in speedy-Explorer and additional files (e.g.: .pdf) need to be renewed. The function is called separately for each file to be created. |
| OnSaveAsDWG | Called from the speedy command “Save as DWG”. |
| OnSaveAsDXF | Called from the speedy command “Save as DXF”. |
| OnSaveAsBMP | Invoked by the speedy command “Save as BMP”. |
| OnSaveAsJPG | Invoked by the speedy command “Save as JPG”. |
| OnSaveAsPDF | Invoked by the speedy command “Save as PDF”. |
| OnSaveAs3DPDF | Invoked by the speedy command “Save as 3D PDF”. |
| OnSaveAsPNG | Invoked by the speedy command “Save as PDF”. |
| OnSaveAsX_B | Invoked by the speedy command “Save as X_B”. |
| OnSaveAsX_T | Invoked by the speedy command “Save as X_T”. |
| OnSaveAsSAT | Called by the speedy command “Save as SAT”. |
| OnSaveAsSTEP | Called by the speedy command “Save as STEP”. |
| OnSaveAsTIF | Invoked by the speedy command “Save as TIF”. |
Configuration parameters
solidedge.
| Key | Description |
|---|---|
| solidedge.autoset.material | Defines whether the material should be set automatically when opening. |
| solidedge.bomtable.autocreate | Defines whether speedy should automatically create a parts list when saving. |
| solidedge.bomtable.autosave | All changes are saved automatically. |
| solidedge.bomtable.autosorted | The parts list is always sorted automatically. |
| solidedge.bomtable.autofreepos | Number of free positions between the individual sort criteria. |
| solidedge.bomtable.basepartignore | Ignore items from base item folders. |
| solidedge.bomtable.fixed | The configuration parameter controls the use of item numbers of the SolidEdge parts list. 0 := Item numbers can be changed in speedy depending on the lock in SolidEdge. 1 := All position numbers are interpreted as fixed, i.e. the position number from SolidEdge is always taken over. Position number editing is locked in speedy. |
| solidedge.bomtable.filterunhandled | Exclude unmanaged files from the parts list. |
| solidedge.bomtable.pathignore | Defines whether the components (see solidedge.bomtable.pathnames) are ignored when determining the parts list. |
| solidedge.bomtable.pathnames | Components that originate from one of the specified directories are not included in the parts list. |
| solidedge.bomtable.summarize | Sum up BOM items when reading the SolidEdge BOM. Default value:=0 SolidEdge already sums up identical parts on its own. |
| solidedge.bomtable.unitcheck | When adding up BOM items (components), note the unit of the respective item. If the unit assigned to the article is not activated for summation, the BOM items are not summed up either, i.e. each component receives its own item in the BOM. See also [document.property.unit] or [solidedge.variable.quantity]. |
| solidedge.checkin.forcesave | Always save when “Save & Close”. |
| solidedge.checkoutondrag | The document is checked out when it is inserted into an assembly by drag & drop. |
| solidedge.component.attachinvisble | |
| solidedge.configuration.forceupdate | Defines whether the update of the variant list is forced when saving. |
| solidedge.configuration.purgereleased | Delete variants that are no longer needed for previously released items. |
| solidedge.document.openfiletype | File extensions of the model files (*.asm;*.par) |
| solidedge.document.openfiletype2 | File endings for drawing files (*.dft) |
| solidedge.documentlist.coldescname | Default column description for document list in rollup |
| solidedge.dropcreatenew.editobject | |
| solidedge.extensions | All |
| solidedge.material.synchronize | Writing material back to the item properties can be controlled. 1 := Material is written back (default) 0 := Material is not written back. |
| solidedge.multipleuse.onsavecheck | Check for multiple use when saving: 0 := do not check 1 := Warn and consult user 2 := Automatically save as new part/assembly 3 := Warn and ask user, if the answer is “save anyway” do nothing, otherwise save automatically as a new part/assembly. |
| solidedge.multipleuse.savesilent | |
| solidedge.partrename.autoondrop | Automatically renumber non-project parts when dragging and dropping. |
| solidedge.partrename.completestruct | Defines whether the entire subassembly structure should be processed when renumbering components. |
| solidedge.partrename.oninsert | Defines whether the determination of non-project parts is to be carried out each time a component is inserted. |
| solidedge.partrename.partdoctypes | |
| solidedge.partrename.pathignore | Defines whether components in defined directories (see solidedge.partrename.pathnames) are to be ignored when determining non-project parts. |
| solidedge.partrename.pathnames | Defines the directories that are to be ignored when determining non-project parts. Enumeration of directories separated by semicolons. |
| solidedge.propertyview.autoswitch | Defines that the Attachment Parts tab is activated if the document has attachment parts. |
| solidedge.propertyview.configurations | |
| solidedge.propertyview.defaulttab | The system remembers the last active tab for the next programme call. |
| solidedge.propertyview.document | Defines whether the Document tab is displayed (in the speedy rollup window). |
| solidedge.propertyview.files | Defines whether the Files tab is displayed. |
| solidedge.propertyview.library | Defines whether the Attachments tab is displayed. |
| solidedge.propertyview.properties | Defines whether the Properties tab is displayed. |
| solidedge.propertyview.relations | Defines whether the Relations tab is displayed. |
| solidedge.propertyview.revisions | Defines whether the Versions tab is displayed. |
| solidedge.propertyview.whereused | |
| solidedge.relation.forceupdate | Defines whether the relations should always be updated when saving an assembly. |
| solidedge.revision.count | Number of revision entries in the revision table. |
| solidedge.revision.first | First revision to be displayed. A value of 0 means the revision table starts with the 1st release. Default value := 0 |
| solidedge.revision.firstline | Write only the 1st line of the revision comment to the version table. |
| solidedge.revision.revlabel | Format the revision label in the revision index. see also [session.revlabel] |
| solidedge.rollup.autorefresh | Defines whether the document list should be refreshed automatically when the rollup window is opened. |
| solidedge.rollup.delay | Defines the delay time for closing the rollup window in 250ms steps. |
| solidedge.rollup.delta | |
| solidedge.rollup.deltaremember | |
| solidedge.rollup.dockable | Show the speedy window either as a dockable SolidEdge window or as a rollup window. |
| solidedge.rollup.unrolltimer | Defines the delay time for opening the rollup window in 250ms steps. |
| solidedge.rollup.show | Show rollup window yes/no. |
| solidedge.save.dependent | When saving or saving&closing, check whether referenced files have been changed. If referenced files have been changed, a dialogue with further options appears. |
| solidedge.script.shutdown | Defines an executable file to be executed on shutdown (e.g. .batch, .exe). |
| solidedge.script.startup | Defines an executable file to be executed at startup (e.g. .batch, .exe). |


