meta data for this page
Documents
Document status
Documents are in certain states in which authorised user groups can perform actions on them, with read or write access. This is shown in the document display by a corresponding symbol.
Additional information about the document
Document list
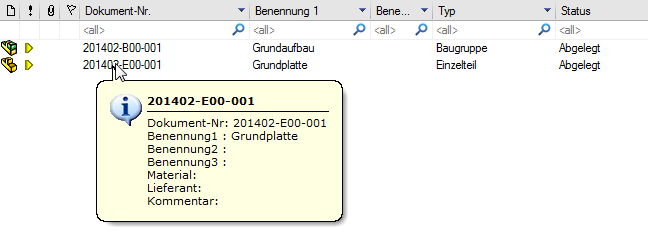
The document list shows all documents in the currently selected folder.
Selecting a document in the list displays the document properties.
The title bar of the document list shows the currently selected folder path. Click on a folder path name to switch to the corresponding folder above it.
If you press the middle mouse button, a tooltip window with further document properties is displayed.
Menu options:
Document List Tabs
By default, a document list exists to display the documents that are in the selected folder or result from the search.
Tabs allow quick switching between several different document lists.
The active tab receives new content when a new folder is selected in the structure.
A tab therefore retains its content until a new folder is selected in the structure.
Context menu for controlling the tabs
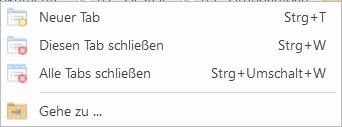
Right-clicking on a tab opens a context menu:
| New tab | Ctrl+T | Creates a new empty tab and activates it. |
| Close this tab | Ctrl+W | Closes the active tab. The previous tab is activated. |
| Close all tabs | Ctrl+Shift+W | Closes all tabs except the first tab. |
| Go to… | Synchronises the navigation structure with the active tab. If the configuration parameter [structure.synctoactivetab] is activated, the corresponding parent element in the structure is automatically selected when switching between tabs. |
To activate a tab, click on the tab with the mouse.
Clicking on a tab with the middle mouse button also closes it.
The first tab cannot be closed.
The name of a tab always corresponds to the current parent element except for the first tab.
When the mouse pointer hovers over a tab, a tooltip shows the current folder path.
Quickly create a new tab
By holding down the Shift key for all functions that result in a new content in the document list,
a new tab is automatically created with the result. These are e.g.:
- Click on a folder
- Direct search
- Part Usage > Search Results
- Go to storage folder
- Parts list > Show articles / Show all articles
Document versions
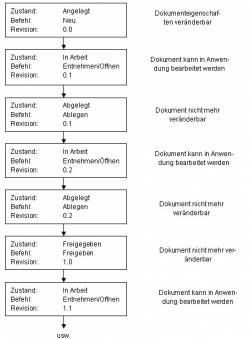
Documents with versioning typically go through the following states:
Document files can only be changed when they have the status “In progress”. The document properties can be changed at any time except for released documents. A new version is created automatically.
If a user takes a document “In work”, no other user has access to the document. After a stored document is released, its revision number also increases. The change status of a document is made up of the revision and version number.
Ex.: Revision 3.6 = 6th version derived from the 3rd revision
Create new document
Ribbon: Document “ New {[Ctrl]+[N]}
Context menu: Document list ” New
Toolbox: New
Before a new document can be created, the project folder must be selected.
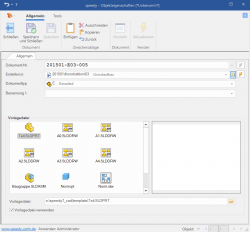
Document number
Displays the new document number. The document number is automatically assigned by the system. Depending on the configuration, a “speaking” or classifying number can be created here. The document number is unique throughout the system.
Create in
Defines the folder where the new document will be stored. A folder must be selected.
Document type
Defines the document type of the new document. A document type must be selected. Depending on the configuration, the document type is already predefined with the selection of a folder.
Naming1/Naming2
Define a title for the new document. The title is used in conjunction with the document number to generate the file name.
Template file
Select a template file for the new document. A list of template files is linked to the document type.
When all entries have been made, confirm the dialogue with OK. The properties dialogue then appears in order to define further document features.
Document properties
Properties tab
Displays general and specific properties of a document. For example, the manufacturer, the various comments on it or the weight of an item.
Tab Versions
Displays the versions and revisions of a document. Each document is displayed with the status, the editor and the document ID.
Menu options:
Files tab
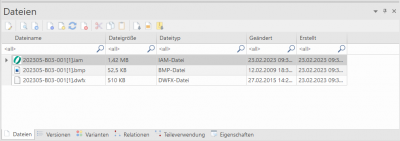
Displays all files that have been stored with this document. Documents can be added by drag & drop or by menu options. Furthermore, you can select from templates that are defined by the document type.
Menu options:
[document.files.sortorder], [session.export.hasfileexportevent], [session.export.renameondragdrop], [document.copyout.undecorate].
Relations tab
Displays (relation/references) documents used by the document. Other articles/documents used for this document. Double-click on them for more information. You can add relations by: Right Mouse Button > Add Relation
Menu options:
Parts Usage tab
Displays the parts usage. The list shows all assemblies in which the document is installed. Double-click to display more detailed information.
Menu options:
Variants tab
All variants (descending articles) of an article are displayed here. Double-click to display more detailed information.
Menu options:
Attachment Documents tab
Displays all appendix documents.
Attachments are links to other items that are related to this item or that are frequently used with this item. Example: A proximity switch is often installed with a cylinder. The cylinder receives the proximity switch as an appendix part. If you now search for the cylinder in Solidworks in order to install it in an assembly, the matching proximity switch is also immediately available and does not have to be searched for first.
Menu options:
Notes tab
Notes on documents can be stored here by dragging and dropping. In the menu bar, it is possible to create notes directly.
Edit document properties
- Ribbon: Document> Properties {[Ctrl]+[E]}
- Context menu: Properties {[Ctrl]+[E]}
- Toolbox properties
- Double click on the document in the document list
Opens the properties dialogue to edit the document properties
General tab
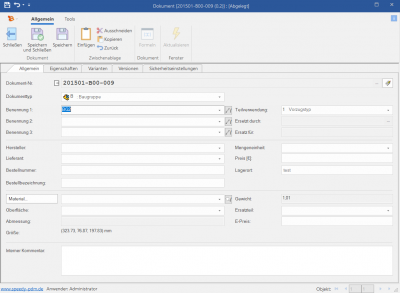
Displays general system information about the document. Data can be changed or a comment can be added. The manufacturer, supplier, price, material, etc. are queried.
Meaning of the input fields:
| Document name | The complete document name is displayed here. If an item (part/assembly) is used once, the document name is highlighted in pink. If an item (part/assembly) is used more than once, the document name is highlighted in red. If the item has already been exported once, the document name appears in blue. |
| Document type | Shows the document type. |
| Designation 1/2/3 | Article designation |
| Manufacturer | Manufacturer |
| Supplier | Supplier |
| Spare part | Indicates whether the item is a spare part and should be output in the spare parts parts list. |
| Unit of measure | Select a unit of measure from the list. |
| Price | Enter the price per unit of measure. |
| Material | Enter a material name or select a material from the list. By selecting the Material button, you can search for a material in the material database. |
| Surface | Enter a surface finish or select one from the list. By selecting a material beforehand, the selection options of the list are limited according to the material properties. |
| Weight | Specifies the part weight based on the data calculated by Solidworks. For single parts, the weight depends on the density defined with the material. |
| Dimensions | Dimensions of the component. (e.g. length, width, height, thickness, …) depending on the dimension type |
| Size | Specifies the size of the part based on the geometry designed in Solidworks. |
Properties tab
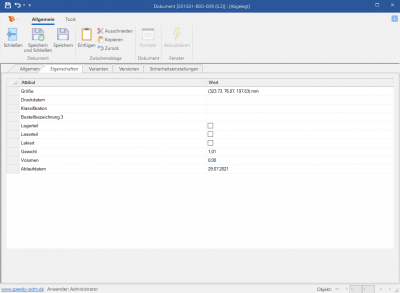
Displays the customised item properties of a document. Values can be changed. Mainly the previous settings are shown, but they will be described in more detail.
Variants tab
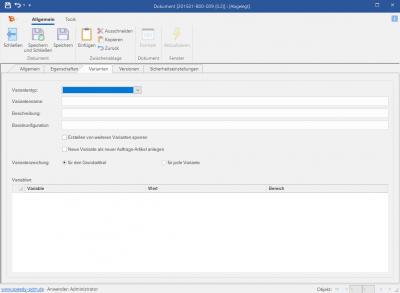
Displays all variants (child items) of a variant item. Variables can be changed. Press [STR]+[mouse click] to open the formula editor for variant articles. This allows you to formulate a formula after naming the variants of an article, for example.
See Variantenartikel
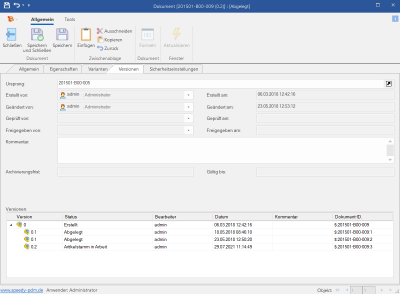
Versions tab
Here you can view the different versions, see their status and find out who edited the article. It is shown by which user and at what time the article was created. In the lower window, all previous versions of this article are displayed. If the article was copied, the URSPRUNG field indicates the origin of the copy.
Remove/open document
Ribbon: Document “ Open {[Ctrl]+[O]}
Extract toolbox
Open toolbox
Context menu document list ” Open
Select the documents to be opened in the document list.
The documents receive the status In work and can now be edited by you or the application assigned to the file type is started and the document file is opened for editing.
While a document is removed and has the status In work, it cannot be edited by other users, the document is locked for other users.
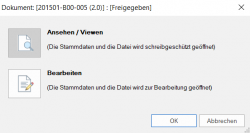
If the document is released, an additional security prompt appears. You have the choice of opening the document read-only or unblocking it and editing it.
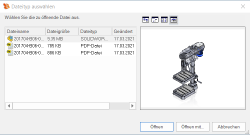
Open with selection
Menu: File > Open with selection
Context menu: Open with selection
Opens a window in which you can select the file you want to edit.
File document
Ribbon: Document “ File {[Ctrl]+[S]}
File toolbox
Context menu document list ” File
Select the documents to be filed in the document list.
The documents receive the status Filed and can now be edited by other users.
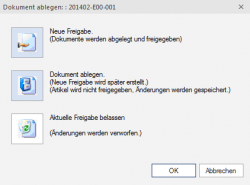
If the document was previously released, an additional prompt appears.
New release
Documents are filed and directly released again.
File document
Documents are only filed. A new release can be created later.
Leave current release
All changes are discarded.
Share document
Ribbon: Document “ Share {[Ctrl]+[R]}
Share Toolbox
Context menu document list ” Share
Select all documents to be released in the document list.
The documents are given the status released.
All files of a released document are stored in a special directory so that the released status is retained in case of further editing (new version). The file status of an older release can be retrieved at any time.
Of course, this also applies to assemblies and their references to other assemblies and parts.
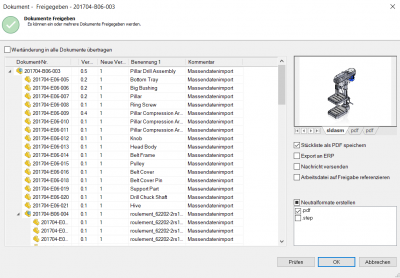
The release dialogue shows all documents to be released and referenced.
In the table, a different “New Version” can also be assigned manually for each document.
A release comment can be assigned for each document. If the check box “Transfer value change to all documents” is activated, a comment entered once is transferred to all documents. The switch must be set before a comment is entered so that the values are transferred.
The release comment can, for example, be printed in the header of a drawing in the change index.
The following options are available for the release:
Save parts list as PDF
The parts lists are also saved as a PDF file on the item when they are released.
(See also configuration parameter [document.release.bomfiletype])
Export to ERP
The article and parts list data are transferred to the ERP system upon release.
(See also configuration parameter [session.export.onrelease])
Send message
After approval, a message is sent to all set recipients.
(See also configuration parameter [document.release.message.xxx])
Reference work file to release
The references of the work files of assemblies are also referenced to the shared files.
(See also configuration parameter [document.release.relink.work])
Create neutral formats
Neutral formats are created or renewed.
The switch is a 3-value switch:
If the switch is deactivated, no neutral formats are created.
If the switch is activated, neutral formats are created from all files, regardless of whether they have already been released.
If the switch is partially activated, neutral formats are only created from files that are to be newly released.
Check
All documents that have not yet been released are checked to see whether any mandatory fields defined in the item master have been filled in correctly.
The check can be carried out manually by clicking on the “Check” button, otherwise the check is carried out automatically before release.
If mandatory fields are not filled in, a corresponding error message is displayed.
Via the configuration switch document.release.extended.checkrevisions you can set whether the check should also check for older revisions.
If a newer revision exists for a document, it is displayed in blue in the list. blue in the list.
Double-click on an entry in the list to open the item master.
Please note that for assemblies that contain sub-parts, the item master is only called up by holding down the control key [CTRL+double-click].
The simple release dialogue can be used by deactivating the configuration parameter [document.release.extended].
View document
Ribbon: File “ View {[Ctrl]+[Q]}
View toolbox
Context menu document list ” View
Select the documents you want to view in the viewer.
The viewer linked to the corresponding file type is started and displays the document file.
If no specific viewer application is defined, the document file will be opened in the appropriate application in read-only mode.
If there is more than one file for the selected document, you must select the file to be viewed.
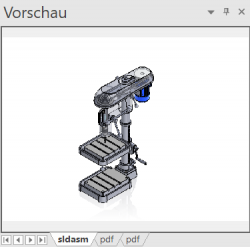
Document preview
If you select a document in the document list, a quick view is displayed in the document preview. If there are several files for the selected document, a tab with the corresponding quick view is displayed for each file. Clicking on a tab displays the corresponding quick view.
By pressing the middle mouse button in the document preview area, you can enlarge the quick view for some file types.
The enlargement is either full-screen or in the available view size.
The preview window remembers the last file type displayed. When switching to another document, it tries to display the previously remembered file type again. However, if the sort order of the file list is controlled by the parameter [document.files.sortorder], the first file is always displayed in the preview window. If no sort order is defined but the parameter [document.preview.openfiletype] is activated, the first available file type from the list of standard file types ([document.openfiletype] + [document.openfiletype2]) is selected.
[document.preview.openfiletype], [document.files.showhidden], [document.files.exthide], [document.files.sortorder].
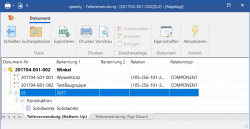
Part usage
Ribbon: Properties “ Part Usage
Context menu: Part usage
Displays the detailed part usage of the document.
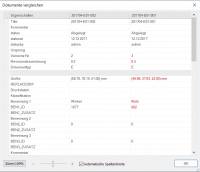
Compare documents
Ribbon: Properties ” Compare Documents
Displays the selected documents and compares them on the basis of the first selected document. The differences are shown with a text marked in red. Nothing can be edited in this dialogue, it is for comparison purposes only.
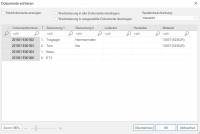
Edit documents (mass data entry)
Ribbon: Properties “ Edit documents
Displays the selected documents. The properties of the selected documents can now be edited. As soon as there are write-protected documents, they are greyed out. The child documents of a document can be displayed via the button Show Child Documents can also be edited. In this case, the basic article is write-protected.
The dialogue is structured like an Excel table in which the individual cells can be edited. As usual in Excel, pressing Enter jumps from one cell to the next.
Via the button Transfer value change to all documents you can have the entire column filled in automatically. I.e. if this switch is set, as soon as you change something in one document, this is applied to all other documents.
With the switch Transfer value changes to selected documents you can have a column filled in automatically for selected documents. I.e. if this switch is set, as soon as you change something in a document, this is applied to all currently selected documents. Multiple documents can be selected by holding down the Ctrl key while clicking or by selecting a range with the Shift key. Then simply type in the desired value. The dialogue then applies the values to the selected lines.
Column descriptions can be defined for mass data entry. These column descriptions must be of the type “edit massedit document mass data”. If several column descriptions are defined, they can be selected from a list in the dialogue. The dialogue remembers the last selected column description and opens the dialogue with it the next time. In the column description you can define which columns remain pinned when scrolling. To do this, the check mark Indented must be activated. If this is ticked, the column is permanently defined. The columns can be specified in the column description with width. With the checkbox Automatic column width the width of the columns can also be automatically adapted to the window size.
Reference Manager
Ribbon: Document ” Properties “ Reference Manager
Copy document
Ribbon: File ” Copy
Copy toolbox
Context menu document list “ Copy
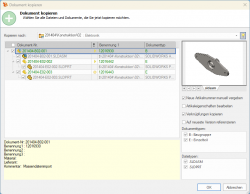
Creates a copy of the selected document.
The document and all associated files are displayed in the structure. The document selected for copying is already marked.
If the document to be copied is an assembly that references parts or subassemblies, these are also displayed in the structure and can be marked for copying.
- By selecting “New item number” you determine that the New dialogue for specifying the item number or designation is called up for each new document.
- The option “Edit item properties” opens the properties dialogue for each copied document.
- The option “Copy links” defines whether the links to appendix parts or links to other documents are also copied.
- The option “Reference to latest version” always lets the copied documents reference the latest version of a file. The copy dialogue shows the current references of the files. However, if a newer version of a file exists in the meantime, this option ensures that the most recent version is used.
[document.copy.checkbaseparts], [document.copy.checkprojectnotequal], [document.copy.copyattached], [document.copy.createnew], [document.copy.description], [document.copy.editproperties], [document.copy.extensions], [document.copy.layouts], [document.copy.maxlevel], [document.copy.newestversion], [document.copy.selectall], [document.copy.validate], [document.copy.uncheckedextensions].
Copy via drag and drop
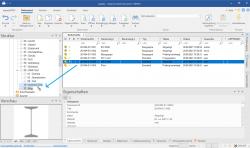
You can also copy a document to another folder or project using drag and drop.
Select the document in the document list and drag it with the left mouse button pressed, a [+] symbol appears at the mouse pointer, over the destination folder until it is marked in grey.
If no [+] symbol appears on the mouse pointer, you are still in move mode. By holding down the [Ctrl] key, you force the copy mode.
After you have released the mouse button, the Copy Document dialogue appears.
Linking by Drag and Drop
To create a link to an existing document in another folder or project, select the document in the document list and drag it over the target folder by holding down the [Ctrl]+[Shift] key until the folder is highlighted in grey.
After you have released the mouse button, a link is created to the document in the destination folder. This is recognisable by the left symbol.
Copy document in the same project
If the article is to be copied in the same project by drag & drop, hold down the [Ctrl] key.
The mouse symbol changes to a [+].
Copy document properties to the clipboard
[Ctrl]+[C] in the document list copies the document objects and the document number to the clipboard.
If several lines are marked, the document numbers are also copied to the clipboard separated by a line break.
If the mouse pointer is positioned over a column, the property of the column is copied to the clipboard instead of the document number.
Delete document
Ribbon: Document ” Delete {[Ctrl]+[X]}
Delete toolbox
Context menu document list “ Delete
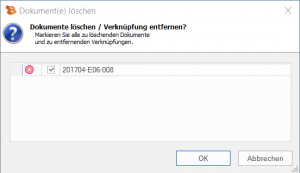
The marked documents are listed again for confirmation in the “Delete Documents” dialogue after the command has been called. All documents that can be deleted are marked in the list. The list symbolises whether the document or a link to the document will be deleted (see also the tooltip).
Lock document
It is possible to lock documents via the purpose of use and thus define changes, installation in assemblies and properties. The document can then no longer be edited.
A user who has the authorisation: UsageEditProperties can, however, continue to edit and change them.
Necessary settings for the usage purpose:
- Allow editing → Unchecked
- Allow insertion → Unchecked
- Check user rights → ticked
- Possibly remove the purpose from the direct search.
This locks the document for this purpose.
Undo
Ribbon: Edit > Undo {[Ctrl]+[R]}
Context menu: Undo {[Ctrl]+[R]}
Undoes the last editing of a document.
Undo approval
Ribbon: Edit > Cancel Release
Cancels the last release. The revision counter is reset. The document can then be edited normally again. However, the document is in such a state that it is waiting for a new release. This is indicated in the document list by a corresponding symbol.
Search documents
Ribbon: Structure > Search {[Ctrl]+[F]}
Search Toolbox
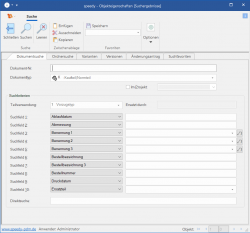
speedy offers various possibilities to search for documents by their properties and to list them in a hit list (search results in the navigation window). The following criteria apply to all options:
- The search for documents is only carried out within a locker.
- The search is based on the current document versions, i.e. older versions/revisions are not included. In the version window, the latest version/revision that meets the search criteria is highlighted.
- The documents found are automatically displayed in the document list and can be edited from here.
- When searching for text entries, the * or % sign can be entered as a placeholder for any text: Ex: all documents containing “MV5” in the designation ” *MV5* all documents whose designation begins with “On” “ On*.
- When searching for text entries, the ? character can be entered as a placeholder for any character.
- Text entries are not case-sensitive.
- Special characters (* ? % _) in the search can be masked with a so-called escape character (\).
Enter your search terms in the respective input fields.
All entered search criteria (input fields) are linked with AND, i.e. all search criteria must be fulfilled in the document properties. Example: Entering *Holder* in the document name and Festo in the supplier searches for all documents that have the term holder in the document name and have Festo defined as the supplier.
If you want to search for several criteria in one input field, the search criteria must be separated by || characters.
Example: You want to search for all items that have Bosch OR Festo as supplier > Bosch || Festo.
Search filter:
| Filter | Meaning |
|---|---|
| <> wert | Der angegebene Wert darf NICHT vorkommen |
| > value | Search for values greater than the specified value. |
| < wert | Suche nach Werten, die kleiner sind als der angegebene Wert. |
| >= value | Search for values that are greater than or equal to the specified value. |
| ⇐ wert | Suche nach Werten, die kleiner oder gleich sind als der angegebene Wert. |
| * | Beliebiger Text an der Stelle |
| ? | Beliebiges Zeichen an der Stelle |
| wert1 | wert2 | Suche nach Wert1 oder Wert2 |
| wert1 OR wert2 | |
| condition1 & condition2 | Suche nach Bedingung1 und Bedingung1. z.B. >50 & <80 |
| condition1 AND condition2 | |
| wert1 :: wert2 | Wertebereich zwischen Wert1 und Wert2 |
| wert1 BETWEEN wert2 |
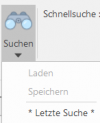
Wenn Sie immer wieder nach den gleichen Begriffen suchen müssen können Sie hierzu einen Suchfavoriten ablegen. Definieren Sie Ihre Suchbegriffe im Suchdialog. Anschließend geben Sie den gewünschten Favoritennamen in der Kombinationsliste (linke untere Ecke des Suchen Dialogs) ein und betätigen den Speichern Schaltknopf.
Die Suchfavoriten stehen Ihnen zum schnellen Zugriff im Aufklappmenü unterhalb der Suchen Schaltfläche direkt zur Verfügung:
Schnellsuche
Mit der Schnellsuche können Sie eine Dokumentsuche auslösen, die automatisch in den wichtigsten Datenfeldern der Dokumenteigenschaften sucht.
Geben Sie einfach den gesuchten Begriff in das Schnellsuchfeld ein und bestätigen Sie mit der Eingabetaste.
Beispiel:
Sie suchen einen Zylinder:
Eingabe in der Schnellsuche Zyl
Es werden alle Artikel aufgelistet die Zyl im Dokumentnamen, der Benennung1, Benennung 2, Benennung 3, Lieferant, Material oder Oberfläche haben.
Sie suchen alle Teile, die als Oberflächenbehandlung eloxiert sind: Eingabe in der Schnellsuche eloxiert
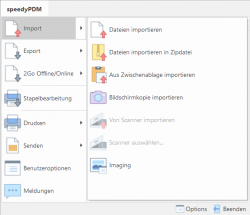
Dateien importieren
Ribbon: File » Importieren » Datei importieren
Importiert eine oder mehrere gewählte Dateien und erstellt daraus jeweils ein speedy/PDM Dokument. Wechseln Sie vor dem Befehlsaufruf in den gewünschten Ablageordner mit Hilfe des Navigationsbaums. Nach Befehlsaufruf werden Sie aufgefordert eine oder mehrere Dateien auszuwählen. Der Dialog für ein neues Dokument wird angezeigt. Der Dateiname wird bereits als Benennung vorgeschlagen. Nehmen Sie weitere Einstellungen vor und bestätigen Sie den Dialog mit OK. Der Artikel wird angelegt und die Datei im speedy/PDM Schließfach abgelegt. Wenn Sie mehrere Dateien importieren erscheint nach dem ersten Import die Abfrage, ob die weiteren Dateien automatisch importiert werden sollen. Wird dies mit „Ja“ bestätigt, werden alle weiteren Artikel automatische importiert und abgelegt.
Speedy unterstützt das Importieren von Dateien per Windows Drag & Drop oder über die Zwischenablage.
Zu ZIP importieren
Menü: Datei > Import > Import to ZIP
When importing one or more selected files, they are packed as a ZIP file and imported as a speedy/PDM document.
Import from clipboard
Menu: File > Import > Clipboard
Imports the content of the clipboard as a new speedy/PDM document.
Import snapshot
Menu: File > Import > Snapshot
Imports a screen snapshot as a new document.
Import TWAIN
Menu: File > Import > TWAIN > Import
Imports an image from a TWAIN compatible device (e.g. scanner or camera).
After the command is called, a device-specific dialogue appears. Make all settings here and scan an image. After successful scanning, the New dialogue appears and prompts for further entries.
In most cases, the scanner dialogue remains active and allows further scanning of images.
Select TWAIN source
Menu: File > Import > TWAIN > Select Source
Allows you to select a TWAIN compatible device.
If there are multiple TWAIN compatible devices, you can select the device to use before importing.
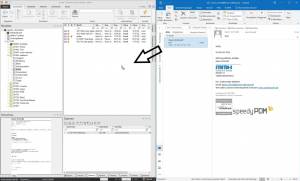
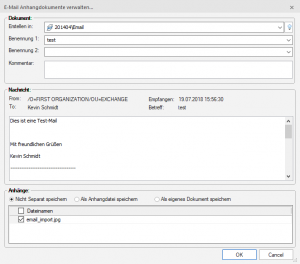
Import Outlook Email
Outlook emails can be dragged and dropped into speedy: Drag and hold the Outlook email with the left mouse button and drop it in the document window.
A new dialogue for emails opens in which all settings for the email document can be made.
If there are attachments to the email, a dialogue opens in which you can select what happens to the attachments. Here you can make general settings for the email document and also settings for the attachment. Attachments can either be saved as an independent new document (Save as own document) or attached to the email as an attachment file (Save as attachment file). If the email is only to be saved as such, this can be done with the selection do not save separately can be done.
If the attachment is to be saved as an independent document, you can enter the document settings such as document type, container and naming directly and no new dialogue is required for the attachment. If you leave e.g. the document type empty, a new dialogue is called up for each attachment.
Only attachments that are ticked are imported!
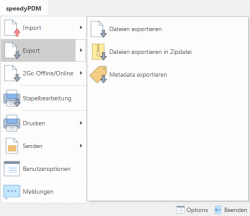
Export
Export files
Ribbon: SPEEDY > Export > Export file
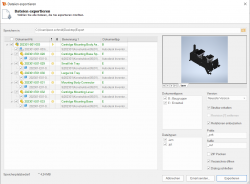
Exports the files of one or more documents to a local directory or a zip file.
Select all documents whose files you want to export. If whole assembly structures are to be exported, it is sufficient to mark the top assembly for export. The export command shows all sub-assemblies and parts referenced by an assembly.
The list shows all files of the previously selected documents. Individual files can be deselected again here. To deselect or select individual files, click on the respective checkbox in the list.
Save in
Defines a directory into which the files are exported.
ZIP Pack
Activate the check box to export the selected files packed as ZIP. The property “Save in” now defines a file name for the ZIP file.
Version
Select a specific version of the document for export.
Remove revision [?]
Defines whether the revision number should be removed from the file name for revisions.
Preserve structure
Defines whether the file storage structure as it exists on the file server is preserved in the export. If this option is deactivated, all files are exported to one directory.
Filter file type
The list shows all file types of the files to be exported. By activating or deactivating a file type, the corresponding files are selected or deselected in the file list.
Export to ZIP
Ribbon: SPEEDY > Export > Export as zip file
Menu: File > Export > Export file as ZIP
Exports the files of one or more documents packed as ZIP into a local directory.
The “Export File” dialogue appears with the “ZIP Pack” check box already activated.
Export document data
Ribbon: SPEEDY > Export > Export Metadata
Exports the document properties of one or more documents.
All document properties of the previously selected documents are exported to a file. The following file formats are available:
- XML - format
- CSV format
- Excel workbook
- Rich Text Format
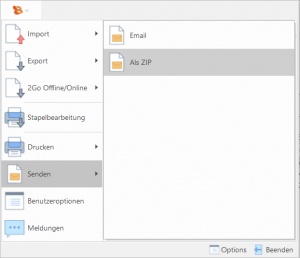
Send Message/Zip
Send message
Menu: File > Send message
Sends the files of the marked documents by email.
All files of the previously marked documents are attached to a new email.
Send ZIP
Menu: File > Send ZIP
Sends the files of the selected documents by email.
All files of the previously marked documents are packed into a ZIP file and attached to a new email.


